How to Connect MCP Servers to Claude, ChatGPT and Other AI Tools
A plain-English, step-by-step guide to the Model Context Protocol (MCP): what it is and how to connect MCP servers to Claude, ChatGPT, VS Code, Cursor and Gemini CLI.
AI assistants are great at answering questions, but they become far more useful when they can work with your own files, tools and online services. The Model Context Protocol (MCP) is the open standard that makes this possible. In this guide we explain what MCP is in plain English, then walk you step by step through connecting an MCP server to the most popular AI apps.
What is MCP?
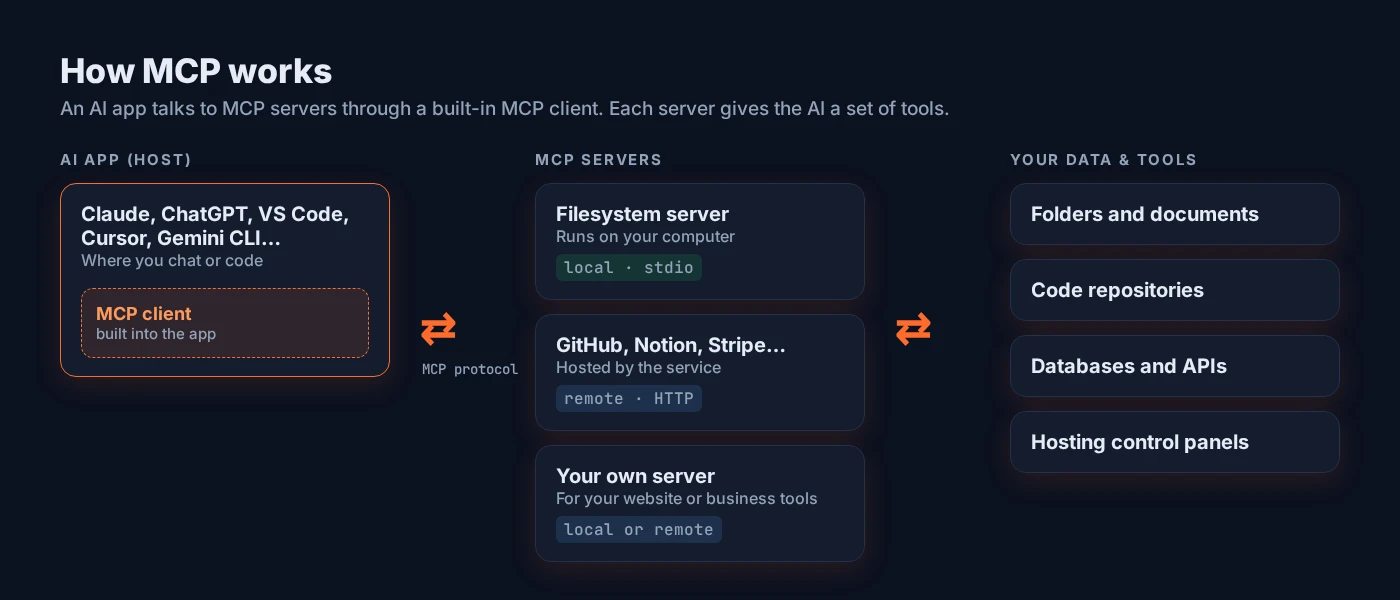
MCP is an open standard, introduced by Anthropic in November 2024, that lets AI applications connect to outside tools and data in a consistent way. A good way to think about it is a USB-C port for AI: instead of every AI app needing its own custom integration for every service, a service builds one MCP server and any app that supports MCP can use it.
There are three pieces:
- The host is the AI app you use, such as Claude, ChatGPT, VS Code or Cursor.
- The MCP client is built into the host app and handles the connection for you.
- The MCP server is a small program that gives the AI a set of tools, such as reading files, searching a database or creating an issue on GitHub.
Local and remote servers
- Local servers run on your own computer. The AI app starts them for you with a command (often
npx) and talks to them over “standard input/output” (stdio). They are ideal for working with files and apps on your computer. - Remote servers run on the internet and you connect to them with a URL over HTTP. Services such as GitHub, Notion and Stripe host their own MCP servers, so there is nothing to install.

Before you start
- Update your AI app to the latest version. MCP features are changing quickly.
- For local servers, install Node.js (the LTS version). Many MCP servers are started with
npx, which comes with Node.js. To check it is installed, open a terminal or command prompt and runnode --version. Some servers use Python instead; the server’s instructions will tell you. - For remote servers, have the server’s URL ready (it often ends in
/mcp), plus any login or API key the service needs. - Only use servers you trust. An MCP server can do anything its tools allow, so treat it like any other software you install. See Staying safe with MCP.
1. Claude Desktop (local servers)
Claude Desktop for macOS and Windows can start local MCP servers for you. This example uses the official Filesystem server, which lets Claude read and organize files in folders you choose.
- Install or update Claude Desktop.
- Open the Claude menu in your computer’s menu bar (not the settings inside the chat window) and choose Settings…
- Go to the Developer tab and click Edit Config. This opens the file
claude_desktop_config.json:- macOS:
~/Library/Application Support/Claude/claude_desktop_config.json - Windows:
%APPDATA%\Claude\claude_desktop_config.json
- macOS:
- Add your server under
mcpServers. Replaceusernamewith your computer’s username, and list only the folders you are happy for Claude to use:
On Windows, write folder paths with double backslashes, for example{ "mcpServers": { "filesystem": { "command": "npx", "args": [ "-y", "@modelcontextprotocol/server-filesystem", "/Users/username/Desktop", "/Users/username/Downloads" ] } } }"C:\\Users\\username\\Desktop". - Save the file, then completely quit Claude Desktop and open it again.
- In a chat, click the + button at the bottom left of the message box, point to Connectors and choose Manage connectors. You should see filesystem and its tools. Claude will ask for your approval before it takes any action.
To add more servers, add another entry inside mcpServers, separated by a comma. If a server needs an API key, add it in an "env" section next to "args".
2. Claude custom connectors (remote servers)
Custom connectors let Claude connect to a remote MCP server by URL, with nothing to install. They are available on the Free, Pro, Max, Team and Enterprise plans. Free accounts are limited to one custom connector.
Pro and Max plans
- Go to Customize → Connectors.
- Click +, then Add custom connector.
- Enter the remote MCP server’s URL.
- If the service gave you an OAuth Client ID and Client Secret, enter them under Advanced settings.
- Click Add.
Team and Enterprise plans
An Owner first adds the connector in Organization settings → Connectors (click Add, choose Custom, then Web, and enter the URL). Members then go to Customize → Connectors, find the connector and click Connect to sign in.
Using a connector in a chat
Click the + button at the bottom left of the chat box, choose Connectors and switch your connector on for that conversation.
3. Claude Code
Claude Code, Anthropic’s coding assistant for the terminal, adds MCP servers with the claude mcp add command.
Remote server (connect by URL):
claude mcp add --transport http notion https://mcp.notion.com/mcpLocal server (Claude Code starts it for you):
claude mcp add --env AIRTABLE_API_KEY=YOUR_KEY --transport stdio airtable -- npx -y airtable-mcp-serverEverything after the -- is the command that starts the server. The -- keeps Claude Code from mixing up its own options with the server’s.
Choose where the server is saved with --scope:
local(the default): only you, only in the current project.project: saved in a.mcp.jsonfile in the project so your team can share it.user: available to you in all of your projects.
Useful commands: claude mcp list shows your servers, claude mcp get NAME shows details, claude mcp remove NAME removes one, and typing /mcp inside a Claude Code session shows server status and lets you sign in to servers that need it.
4. ChatGPT
ChatGPT connects to remote MCP servers through Developer mode. It does not start local servers on your computer, so the server must be reachable by URL (it supports the SSE and streaming HTTP transports). Developer mode is available on the web for Plus, Pro, Business, Enterprise and Education accounts.
- Open ChatGPT on the web and go to Settings → Security and login, then turn on Developer mode. On Business, Enterprise and Education workspaces, an admin may need to allow it first.
- In ChatGPT’s apps settings, click + to create a developer-mode app for your MCP server. Give it a name and description, enter the server URL (including the
/mcppath) and choose how it signs in (OAuth or no authentication). New apps appear under Drafts. - In a chat, open the + menu, choose Developer mode and select your app.
Tip: ChatGPT picks tools more reliably when you name them, for example “Use the Acme CRM app’s update_record tool to…”.
OpenAI updates these menus often. If a label looks different, look for Apps or Connectors in ChatGPT’s settings, and check OpenAI’s current help article linked at the end of this guide.
5. VS Code (GitHub Copilot)
VS Code reads MCP servers from a file called .vscode/mcp.json in your project. Note that VS Code uses the key servers, not mcpServers:
{
  "servers": {
    "playwright": {
      "command": "npx",
      "args": ["-y", "@microsoft/mcp-server-playwright"]
    },
    "github": {
      "type": "http",
      "url": "https://api.githubcopilot.com/mcp"
    }
  }
}
You can also open the Command Palette (Ctrl+Shift+P on Windows and Linux, Shift+Cmd+P on Mac), run MCP: Add Server and follow the prompts, choosing Workspace (this project) or Global (all projects). To edit your personal, all-projects list, run MCP: Open User Configuration.
6. Cursor
Cursor reads MCP servers from .cursor/mcp.json in your project, or from ~/.cursor/mcp.json in your home folder for all projects. Project settings take priority.
{
  "mcpServers": {
    "my-local-server": {
      "command": "npx",
      "args": ["-y", "some-mcp-server"],
      "env": { "API_KEY": "${env:API_KEY}" }
    },
    "my-remote-server": {
      "url": "https://api.example.com/mcp",
      "headers": { "Authorization": "Bearer ${env:MY_TOKEN}" }
    }
  }
}
The ${env:...} syntax reads a value from your computer’s environment variables, so you don’t have to type secret keys into the file. Once added, your servers appear in Cursor’s settings, where you can turn them on or off.
7. Gemini CLI
Google’s Gemini CLI can add servers with a command:
# Local server
gemini mcp add my-server python server.py

# Remote server (streaming HTTP)
gemini mcp add --transport http my-remote https://api.example.com/mcp
Or add them by hand to ~/.gemini/settings.json (all projects) or .gemini/settings.json (one project), under mcpServers. Use command and args for a local server, httpUrl for a streaming HTTP server, or url for an SSE server. Run gemini mcp list to see your servers, or type /mcp inside Gemini CLI.
Quick comparison
| App | Local servers | Remote servers | Where to set it up |
|---|---|---|---|
| Claude Desktop | Yes | Yes | Settings → Developer → Edit Config, or Customize → Connectors |
| Claude on the web | No | Yes | Customize → Connectors |
| Claude Code | Yes | Yes | claude mcp add |
| ChatGPT | No | Yes | Settings → Security and login → Developer mode |
| VS Code | Yes | Yes | .vscode/mcp.json or MCP: Add Server |
| Cursor | Yes | Yes | .cursor/mcp.json or ~/.cursor/mcp.json |
| Gemini CLI | Yes | Yes | gemini mcp add or ~/.gemini/settings.json |
Staying safe with MCP
- Only connect servers you trust, ideally from the service’s own company or a well-known open-source project. A server that isn’t trustworthy could misuse the access you give it, or try to feed the AI misleading instructions (known as prompt injection).
- Give the least access needed. Share only the folders a server really needs. When a service lets you create an API key or token, give it only the permissions it needs and, where possible, an expiry date.
- Keep secret keys out of chats and shared files. Use environment variables where the app supports them, and don’t commit a config file that contains keys to a shared code repository.
- Read approval requests before you click. AI apps ask before a tool takes an action. Take a moment to check what it is about to do.
- Remove servers you no longer use.
Troubleshooting
- The server doesn’t appear: completely quit and reopen the app. Most apps only load MCP settings when they start.
- Check your JSON. A missing or extra comma, or a missing quote mark, stops the whole file from loading. Paste it into a JSON validator if you’re not sure.
- Use full folder paths, such as
/Users/username/Desktop, not shortcuts or relative paths. - Run the server command yourself in a terminal (for example the
npx ...line from your config) to see any error messages. - Check the logs. Claude Desktop writes MCP logs to
~/Library/Logs/Claudeon macOS and%APPDATA%\Claude\logson Windows. Look atmcp.logand themcp-server-NAME.logfile for your server. - Remote server won’t connect: double-check the URL (including the
/mcppath if the service uses one) and sign in again. In Claude Code, run/mcpto see each server’s status.
Official documentation
AI apps change quickly. We checked every step in this guide against the official documentation in September 2026. If something looks different, these pages have the latest instructions:
Need a hand with your website or hosting?
Talk to a real person at GreaterLink, any time, day or night.
More from the blog

Meet Uplink: How GreaterLink’s AI Upgrades Your Website and Fixes Your SEO
Meet Uplink, GreaterLink’s AI. See how it redesigns or updates your website by chat, handles your SEO automatically every time you publish, and how the free Uplink SEO Checkup shows you what to fix next.

Meet Uplink, the GreaterLink AI Website Builder: 3 Custom Designs in Minutes
Meet Uplink, our new AI Website Builder. It designs three custom homepages from a description of your business. Edit by chatting, keep or redesign your current site, and publish in one click.

Do I Need a Website If I Have a Facebook Page?
Facebook is a great start for a small business, but it isn’t a website. Here’s what each one does well, where Facebook falls short, and how to use both together.